
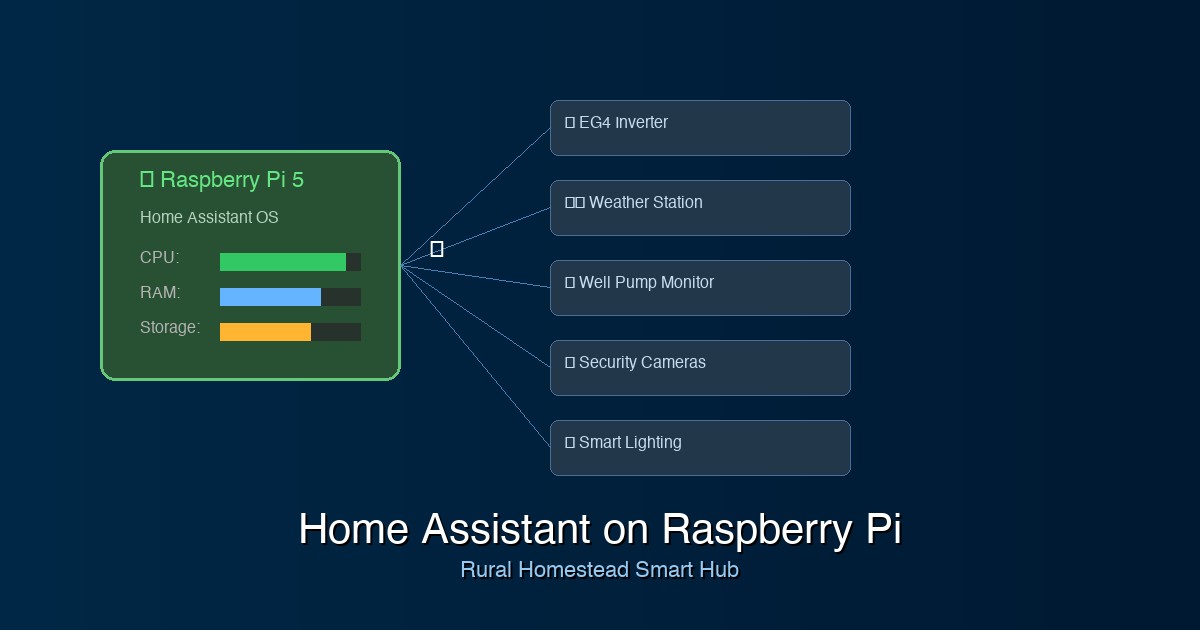
Real setup, real experience. I’m running multiple Raspberry Pi devices for home automation, and I’ll show you exactly how to set one up for your rural smart home.
Setting Up Home Assistant on a Raspberry Pi: The Rural Homestead Guide
Living on a rural homestead comes with unique challenges – from monitoring well pumps and generator status to keeping track of livestock, weather conditions, and security across sprawling properties. While city folks might worry about smart doorbells and voice assistants, rural homeowners need robust automation that can handle the real demands of country living.
That’s where Home Assistant on a Raspberry Pi becomes a game-changer. This powerful combination gives you enterprise-level home automation at a fraction of the cost, perfect for automating everything from your backup generator to soil moisture sensors in your garden. Let’s walk through setting up a complete Home Assistant system tailored specifically for rural homestead needs.
Why Home Assistant + Raspberry Pi is Perfect for Rural Properties
Before we dive into the setup, let’s talk about why this combination works so well for rural homeowners:
- Local Control: No reliance on internet connectivity – crucial when your broadband goes down
- Extensible: Connect everything from Z-Wave well pump controllers to custom ESP32 sensors
- Cost-Effective: No monthly subscriptions or per-device fees
- Privacy-Focused: Your data stays on your property
- Reliable: Designed to run 24/7 with minimal maintenance
What You’ll Need: Complete Hardware Shopping List
Let’s start with the essentials. I’ve researched the best current products available on Amazon to ensure you get quality components that work well together.
Core Components
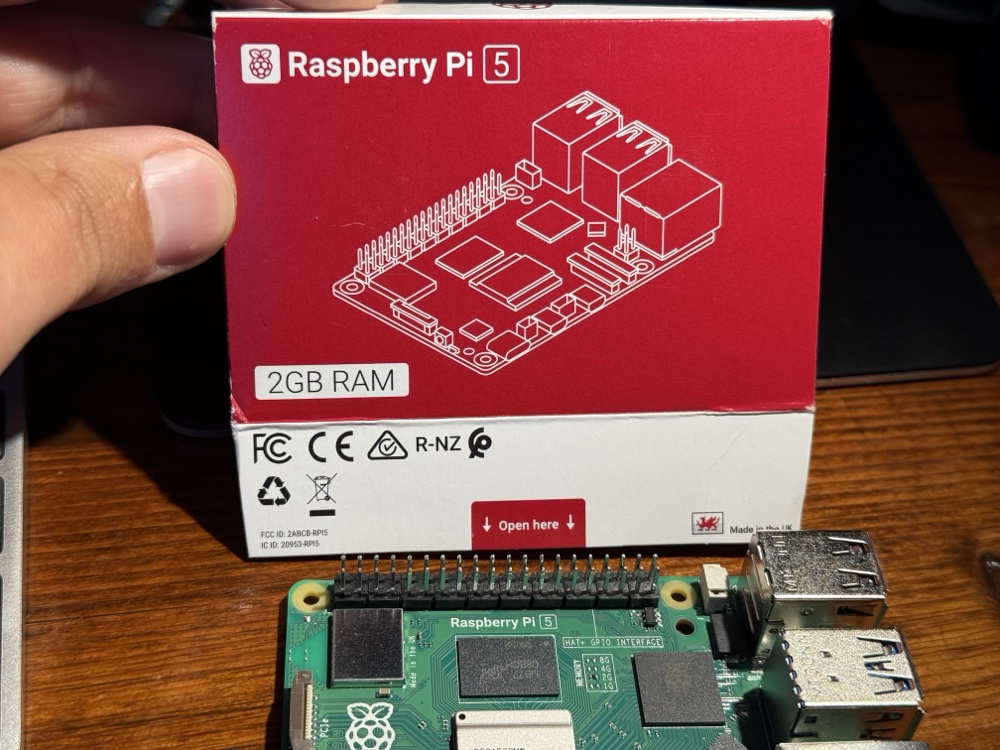
1. Raspberry Pi Kit
iRasptek Starter Kit for Raspberry Pi 5 (4GB RAM) – $89.99
This complete kit includes the Pi 5, case, power supply, heat sinks, and a 64GB microSD card with the OS pre-loaded. The Pi 5 offers significant performance improvements over the Pi 4, crucial for running Home Assistant smoothly with multiple integrations.
2. Zigbee Coordinator
SONOFF Zigbee 3.0 USB Dongle Plus-P – $16.99
Essential for connecting Zigbee smart devices. The SONOFF dongle is well-supported by Zigbee2MQTT and handles up to 200+ devices – plenty for even the largest homesteads.
3. Z-Wave Controller (Optional but Recommended)
Aeotec Z-Stick 7 USB Adapter – $59.95
For connecting Z-Wave devices like well pump controllers and outdoor sensors. Z-Wave offers better range and mesh reliability for outdoor applications.
Essential Smart Devices for Rural Automation
Smart Switches and Outlets
- TREATLIFE Zigbee Smart Switch (4-pack) – $39.99
Perfect for controlling barn lights, pump houses, and outdoor lighting - SONOFF Zigbee Smart Plug (4-pack) – $31.99
Great for automating feed timers, heated waterers, and equipment monitoring
Sensors for Monitoring
- Aqara Temperature & Humidity Sensor (6-pack) – $69.99
Monitor conditions in barns, greenhouses, root cellars, and equipment sheds - Aqara Water Leak Sensor (3-pack) – $44.97
Essential for pump house monitoring and livestock water system alerts - Aqara Door/Window Sensor (4-pack) – $39.99
Secure barns, equipment sheds, and house entry points
Weather Monitoring
- Ambient Weather WS-2902 WiFi Smart Weather Station – $189.99
Professional-grade weather monitoring with wind speed, rainfall, UV, and solar radiation sensors
Security and Cameras
- Reolink PoE Security Camera System – $399.99
8-channel NVR with 4 outdoor cameras, perfect for monitoring driveways, pastures, and buildings
ESP32 Boards for Custom Sensors
- ESP32 Development Board Kit (5-pack) – $24.99
For custom projects like soil moisture sensors, water tank level monitoring, and gate automation - Waterproof Soil Moisture Sensors (5-pack) – $16.99
Perfect for garden and field monitoring when paired with ESP32 boards
Cost Breakdown: Investment in Rural Automation
Here’s what you’re looking at for a complete starter system:
- Core System: $166.93 (Pi kit + Zigbee dongle + Z-Wave controller)
- Basic Automation: $71.98 (smart switches + smart plugs)
- Monitoring Sensors: $154.95 (temperature, leak, door sensors)
- Weather Station: $189.99
- Security System: $399.99
- Custom Sensor Kit: $41.98
Total Investment: $1,025.82
Compare this to commercial rural monitoring systems that can cost $5,000-15,000+ with monthly fees, and the Home Assistant route becomes incredibly attractive. You’ll have paid for the system in savings within the first year while gaining much more flexibility and control.
Step 1: Setting Up Your Raspberry Pi
Flashing the SD Card (If Not Pre-Loaded)
If you bought a kit with a pre-loaded SD card, you can skip this step. Otherwise, you’ll need to flash Home Assistant OS to your microSD card:
- Download the Raspberry Pi Imager
- Download Home Assistant OS for Raspberry Pi
- Use the imager to flash the Home Assistant OS image to your 64GB+ microSD card
- Insert the SD card into your Raspberry Pi
Initial Boot and Network Setup
- Connect your Pi to your router via Ethernet cable (recommended for initial setup)
- Connect the power adapter and wait 5-10 minutes for first boot
- Find your Pi’s IP address in your router’s admin panel
- Navigate to
http://[PI_IP_ADDRESS]:8123in your web browser - Follow the setup wizard to create your admin account
Pro Tip: Set a static IP address for your Pi in your router settings. This ensures you can always access it at the same address, crucial for rural properties where network equipment might reboot frequently.
Step 2: Essential Home Assistant Configuration
Enable Advanced Mode
First, enable advanced mode to access all configuration options:
- Click on your username in the bottom left corner
- Toggle “Advanced Mode” to ON
- Restart Home Assistant
Install Essential Add-ons
Navigate to Settings → Add-ons → Add-on Store and install:
- File Editor: For editing configuration files
- Terminal & SSH: For command-line access
- Zigbee2MQTT: Essential for Zigbee device management
- ESPHome: For managing custom ESP32 sensors
- MQTT Broker: Required for Zigbee2MQTT
Step 3: Setting Up Zigbee2MQTT
This is where the magic happens for rural automation. Zigbee2MQTT allows you to connect dozens of sensors and smart devices without relying on proprietary hubs.
Connect Your SONOFF Zigbee Dongle
- Plug the SONOFF Zigbee dongle into a USB port on your Raspberry Pi
- In Home Assistant, go to Settings → Add-ons → MQTT Broker
- Start the MQTT Broker and enable “Start on boot”
- Go to Settings → Add-ons → Zigbee2MQTT
- Configure the serial port (usually
/dev/ttyUSB0for SONOFF dongles) - Start Zigbee2MQTT and enable “Start on boot”
Pairing Your First Devices
Let’s start with a temperature sensor in your barn:
- Open the Zigbee2MQTT web interface (Settings → Add-ons → Zigbee2MQTT → Open Web UI)
- Click “Permit Join” to enable pairing mode
- Follow your sensor’s pairing instructions (usually holding a button for 5 seconds)
- The device should appear in the Zigbee2MQTT interface within 30 seconds
- Rename the device to something descriptive like “Barn_Temperature”
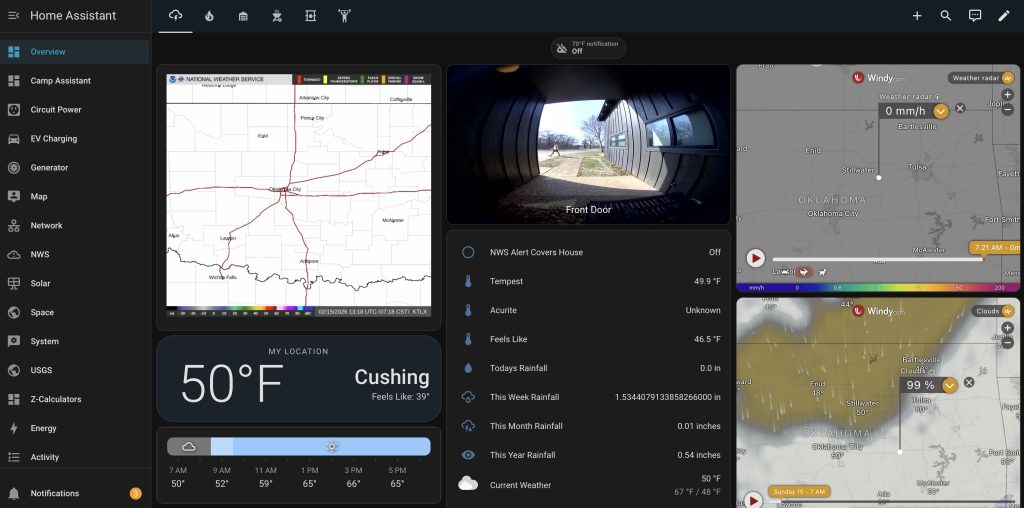
Step 4: Weather Station Integration
Weather monitoring is crucial for rural properties. The Ambient Weather WS-2902 integrates beautifully with Home Assistant:
- Set up your weather station according to the manufacturer’s instructions
- Create an account at ambientweather.net
- In Home Assistant, go to Settings → Devices & Services → Add Integration
- Search for “Ambient Weather Network” and add your API keys
- Your weather data will now appear in Home Assistant

Step 5: Rural-Specific Automations
Here’s where Home Assistant really shines for rural properties. Let’s set up some practical automations:
Well Pump Monitoring
Monitor your well pump’s power consumption to detect issues:
alias: Well Pump Alert
description: Alert if well pump runs too long or draws excessive power
trigger:
  - platform: numeric_state
    entity_id: sensor.well_pump_power
    above: 15
    for:
      hours: 1
action:
  - service: notify.notify
    data:
      message: "Well pump has been running for over 1 hour. Check for leaks or pump issues."
Freeze Protection
Automatically turn on heated waterers when temperatures drop:
alias: Freeze Protection
description: Turn on heated waterers below 35°F
trigger:
  - platform: numeric_state
    entity_id: weather.ambient_weather
    attribute: temperature
    below: 35
action:
  - service: switch.turn_on
    target:
      entity_id: switch.barn_heated_waterer
Generator Auto-Start
Monitor power outages and send alerts for generator startup:
alias: Power Outage Generator Alert
description: Alert when power goes out for generator startup
trigger:
  - platform: state
    entity_id: binary_sensor.power_grid_status
    to: "off"
    for:
      minutes: 5
action:
  - service: notify.notify
    data:
      message: "Power outage detected. Consider starting backup generator."
Step 6: ESP32 and ESPHome for Custom Sensors
This is where things get really exciting. ESP32 boards let you create custom sensors for unique rural monitoring needs.
Setting Up ESPHome
- In Home Assistant, go to Settings → Add-ons → ESPHome
- Start the add-on and open the web interface
- Click “New Device” to create your first ESP32 configuration
- Choose ESP32 as the platform
- Enter your WiFi credentials
Soil Moisture Sensor Example
Here’s a basic configuration for a garden soil moisture sensor:
esphome:
  name: garden-moisture-1
  platform: ESP32
  board: esp32dev

wifi:
  ssid: "YourWiFiNetwork"
  password: "YourWiFiPassword"

api:
  encryption:
    key: "your-encryption-key"

ota:

logger:

sensor:
  - platform: adc
    pin: A0
    name: "Garden Soil Moisture"
    unit_of_measurement: "%"
    filters:
      - calibrate_linear:
          - 0.0 -> 100.0
          - 1.0 -> 0.0
Water Tank Level Sensor
Monitor your livestock water tank levels with an ultrasonic sensor:
sensor:
  - platform: ultrasonic
    trigger_pin: GPIO12
    echo_pin: GPIO13
    name: "Water Tank Level"
    unit_of_measurement: "inches"
    filters:
      - lambda: return 48 - x; # Tank is 48 inches deep
Step 7: Security Camera Integration
The Reolink camera system integrates seamlessly with Home Assistant:
- Set up your Reolink NVR system following manufacturer instructions
- In Home Assistant: Settings → Devices & Services → Add Integration
- Search for “Reolink” and add your NVR’s IP address and credentials
- All cameras will automatically appear as entities
- Set up motion detection alerts for different zones (driveway, barn, pasture)
Advanced Rural Automations
Livestock Feed Timer
Automate feed dispensers with smart plugs:
alias: Morning Feed Time
description: Turn on automatic feeders at 7 AM
trigger:
  - platform: time
    at: "07:00:00"
action:
  - service: switch.turn_on
    target:
      entity_id: switch.chicken_feeder
  - delay: "00:00:30"
  - service: switch.turn_off
    target:
      entity_id: switch.chicken_feeder
Severe Weather Alerts
Get alerts for dangerous conditions:
alias: Severe Weather Alert
description: Alert for high winds that could damage structures
trigger:
  - platform: numeric_state
    entity_id: sensor.ambient_wind_speed
    above: 40
action:
  - service: notify.notify
    data:
      message: "High winds detected ({{ states('sensor.ambient_wind_speed') }} mph). Secure loose items and check structures."
Energy Usage Monitoring
Track power consumption across your property:
alias: High Energy Usage Alert
description: Alert when daily energy usage exceeds normal
trigger:
  - platform: numeric_state
    entity_id: sensor.daily_energy_consumption
    above: 50
action:
  - service: notify.notify
    data:
      message: "Daily energy usage is unusually high. Check for equipment malfunctions."
Maintenance and Best Practices
Regular Backups
Set up automatic backups to protect your configuration:
- Install the “Google Drive Backup” add-on
- Configure daily automatic backups
- Test restore procedures quarterly
Security Considerations
- Change default passwords on all devices
- Use strong, unique passwords
- Enable two-factor authentication where available
- Keep devices updated with latest firmware
- Segment IoT devices on a separate network if possible
Power Management
Rural power can be unreliable. Consider:
- UPS backup for your Raspberry Pi
- Surge protection for all equipment
- Generator auto-transfer monitoring
- Solar charging for remote sensors
Troubleshooting Common Issues
Zigbee Range Issues
Rural properties are large. If devices lose connection:
- Add powered Zigbee devices (smart plugs) to extend the mesh
- Position repeaters strategically between buildings
- Consider external antennas for your coordinator
- Use weatherproof enclosures for outdoor repeaters
WiFi Connectivity for ESP32
- Use WiFi extenders or mesh systems for large properties
- Consider directional antennas for distant locations
- Implement watchdog timers for automatic reconnection
- Use deep sleep modes to conserve battery in remote sensors
Expanding Your System
Once you have the basics running, consider these additions:
Advanced Monitoring
- Soil temperature sensors for frost alerts
- Water quality monitors for livestock systems
- Air quality sensors for barns and equipment sheds
- Vibration sensors for early equipment failure detection
Vehicle and Equipment Integration
- GPS trackers for valuable equipment
- Engine hour meters for maintenance scheduling
- Fuel level monitoring for tanks and equipment
- Battery voltage monitoring for stored vehicles
Conclusion: Your Smart Rural Homestead Awaits
Setting up Home Assistant on a Raspberry Pi transforms your rural property into a connected, intelligent homestead. From monitoring well pumps and weather conditions to automating feed times and securing remote buildings, this system gives you unprecedented control and peace of mind.
The initial investment of around $1,000 pays for itself quickly through prevented equipment failures, reduced maintenance trips to remote locations, and the invaluable early warning system for weather and security events. Plus, unlike commercial alternatives, you own and control every aspect of your system.
Start with the core components and basic sensors, then gradually expand as you identify specific needs on your property. The modular nature of Home Assistant means you can always add more devices and create new automations as your homestead evolves.
Remember, the key to success with any automation system is starting simple and building complexity gradually. Master the basics first – temperature monitoring, basic switches, and simple alerts – then move on to more advanced features like custom ESP32 sensors and complex multi-condition automations.
Your rural homestead deserves the same smart home technology as any city dwelling, and with Home Assistant on a Raspberry Pi, you can have it all while maintaining the independence and self-reliance that drew you to rural living in the first place.
Have questions about implementing Home Assistant on your homestead? Drop a comment below, and let’s help you build the smart rural property of your dreams!